 |
| Using the images that I took I decided to experiment with them. I layered the photos over each other, resized them to give the impression of depth and blend them together using layer masks. I also used the pen tool to make refined cutouts of parts of some of the photos e.g.(the log in the background). The more I practice the more I feel more confident that this idea will work. |

Sunday, 26 January 2014
Photomontage Techniques

Gathering Photos


 |
| Today I decided to go out into the peak district to gather photos to use for my project, after looking at some of Eric Johannsons work I liked the idea of using water. the river that I found was roaring and was perfect for some interesting imagery, the surrounding woodland was also gave me the opportunity to take a variety of images. How I see this relating to my project is its about that freedom of being outside, the opposite of being sat in front of a screen. Tomorrow I am in sheffield so I am going to use this time to hopefully gather more images, the urban landscape seems another good choice for potential ideas. |
Thursday, 23 January 2014
Photomontage Techniques
 |
| This time I have used the same process but have used more of my own images , again using layer masks but to add some shadow under the bike to make it look more real I have used the burn tool to burn shadows on the road layer. Road and stormy sky image is from the auto world stock archive acquired from www.istock.com |
Photomontage Techniques
 |
| This task was about understanding the use of layer masks. Layer masks enable me to blend photos together without erasing any of the pixels so I can change anything back if needed. In the image I wanted to give the impression that elements are coming out of the television, when we play games we immerse or self into a virtual reality as if we are there so what I have tried to do is show that in a visual sense. This method needs refined because the photos don't fit the right, the angle of the waterfall looks odd and the colours don't match up right, these little details need to be considered if I am going to make this effect look right in the final piece. Images sourced from www.4afzal.blogspot.com Television image is my own |
Digital Painting Techniques
 |
| This task was about experimenting with different compositions. I like some of the ideas that came out of this task, the idea of a gaming chair that feeds you food and any other task that makes you put the pad down, so that you are never taken away from the screen, and it has made me realise that I want to add some humour into the image. |
 |
| This task was to block in shapes with simple flat colours to get more confidence using a graphics tablet. Overall I feel more confident in the idea and the technique behind it , It needs more refinement but I think It will work. |
Wednesday, 22 January 2014
Photo Manipulation Techniques

 |
 |
 |
| These images are my first steps into photo manipulation, I started by taking photos at work then importing them into photoshop. then I slowly and carefully cut around the biker using the pen tool, for me it is the best method because you have more control of the selection. I could soften the edges if needed as well using a soft brush with a layer mask, but the down side is the time it takes but the more practice the quicker the results. |
Tuesday, 21 January 2014
Composition
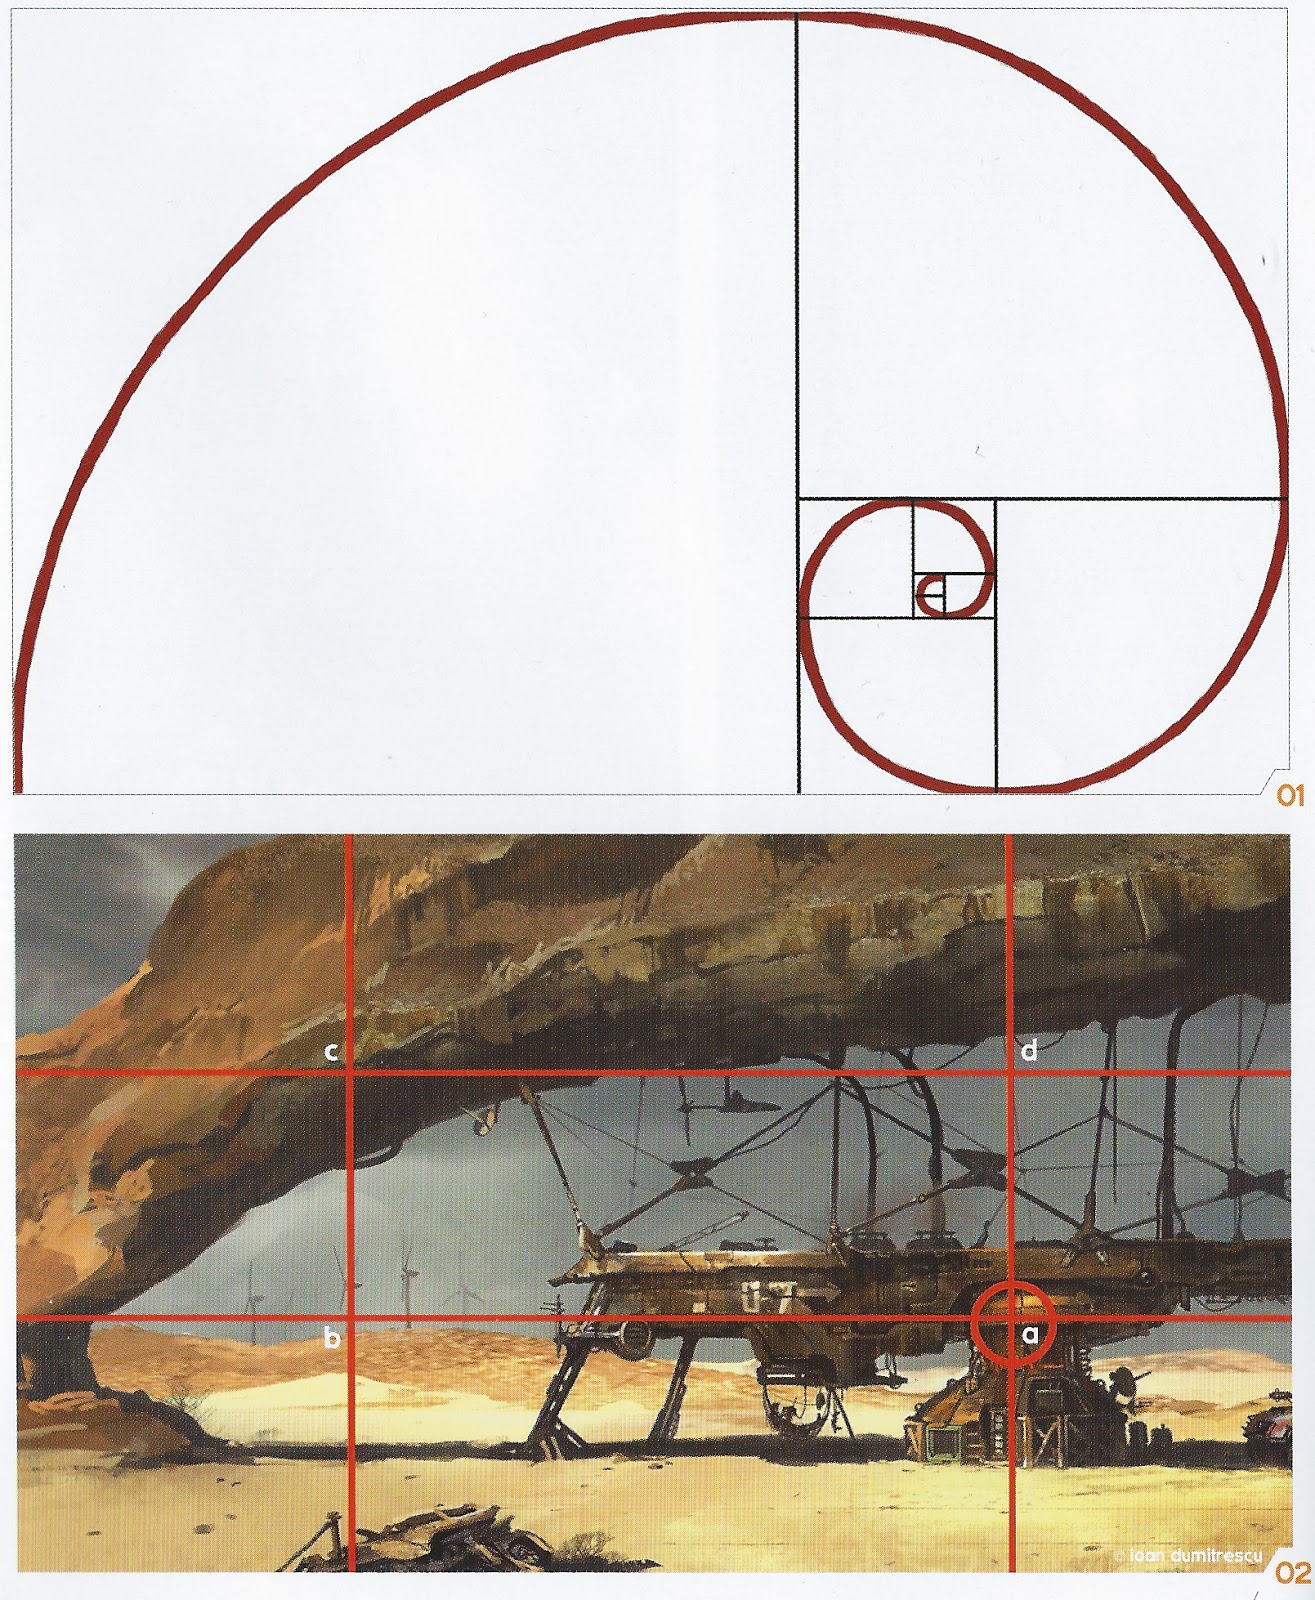 |
| Art Work(above and Below) done By Ioan Dumitrescu Sourced from Beginners Guide to Digital Painting ISBN 978-0-9551530-7-5 Composition Is a one of the most important things in design, but It is a side that I have over looked. But I want my Images to be as professional as can be, so I want a good composition. The image with the spiral in it is known as Fibonacci spiral or also known as the golden sections, It acts as a sort of template to use for a good composition. You can see how it has been used on the image below, leading your eye to the main part of the image. I am going to use this idea when I start sketching out my thumbnails for both of the images I want to create. |
 |
| The images also have been divided into equal rectangles, this is known as "the rule of thirds", by doing this you are creating for points of interest (where the lines cross). the spiral dictates where the main focus will be but the other points are there for other points of interest e.g. the wind farm in the background on point c. this rule can also apply to a vertical image as well. |
Subscribe to:
Posts (Atom)